There’s no denying the convenience of frozen patties for grilling hamburgers, but they’re often made of sub-par meat or have questionable additives. Solve the problem by using home-ground beef or ground beef from a butcher or a store you trust and make your OWN frozen patties for grilling hamburgers! Bonus: You can take advantage of meat sales to save money!

I love the convenience of frozen patties for grilling hamburgers. I seldom like the texture or flavour, though, of commercially purchased patties… they’re all a little like old boot if we’re being honest.
Part of the issue at hand is user error: we don’t always finesse frozen patties for grilling the way we do handmade ones. The bigger parts of the problem, however, are the quality of the beef used in the ones that are sitting in your grocer’s freezer and the way the beef is handled that goes INTO the patties.
It’s the meatball phenomenon. It’s hard to love taking the time to hand form a bajillion meatballs, but the ones made by hand are always superior in texture to the little floor hockey pucks sold in the freezer section. It’s the light touch that makes a difference. That’s why I often make a double or triple batch of meatballs to freezer for later meals.

This same logic applies to making your own frozen patties for grilling hamburgers. Are you prepping burgers to grill? It’s not much extra effort to make a double batch of patties and freeze half for a fast meal further on down the road. Simple, right?
Aaaaaaaand, AND, and… You can take advantage of sales on ground beef or primal cuts of beef (i.e. a nice big chuck roast) and stockpile some frozen patties for grilling hamburgers later saving yourself money on down the road! Save money and eat better in the process? Who doesn’t want that?
Are you looking for more delicious and economical ground beef recipes? Try out our Ground Beef Fried Rice a.k.a. Cheeseburger Fried Rice as well as our 15 Minute Korean Style Beef and Cheater Sesame Beef.

Tips for Making Perfect Patties for Grilling Hamburgers:
Make them uniform in size and shape. This way every burger you cook is done at the same time.
To keep them all the same shape, use an open-topped round cookie cutter. I use the largest cutter from this Plain Round Cutter Set (affiliate link). It’s my fave.
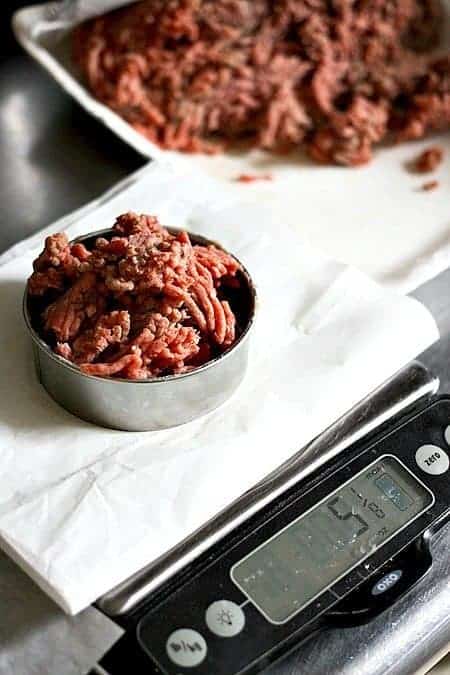
To keep them all the same size, you can use a kitchen scale (affiliate link) like I do, or eyeball it and try to fill it to the same place every time on the cookie cutter. I prefer the precision of the scale. Obsessive? Yeah, but my burgers kind of rock.
Don’t handle the meat too much. Using too much pressure or taking too long to shape it yields a tough burger. Besides that, the heat of your hands can actually make the final burger tougher, too.
That’s another reason the cookie cutter works so brilliantly. You get a perfect shape every time without mangling and over-handling the meat.
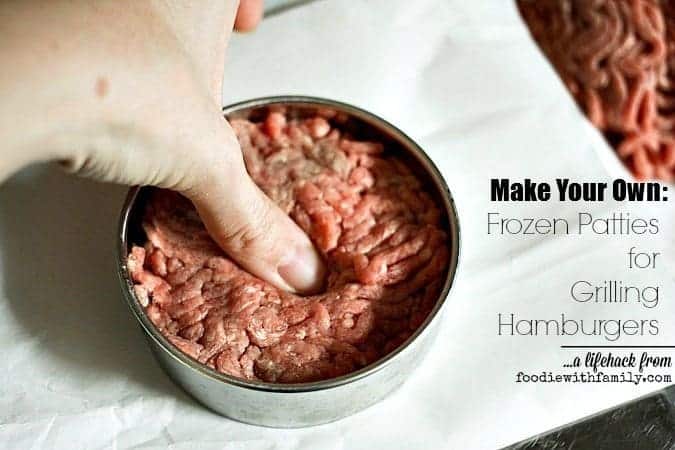
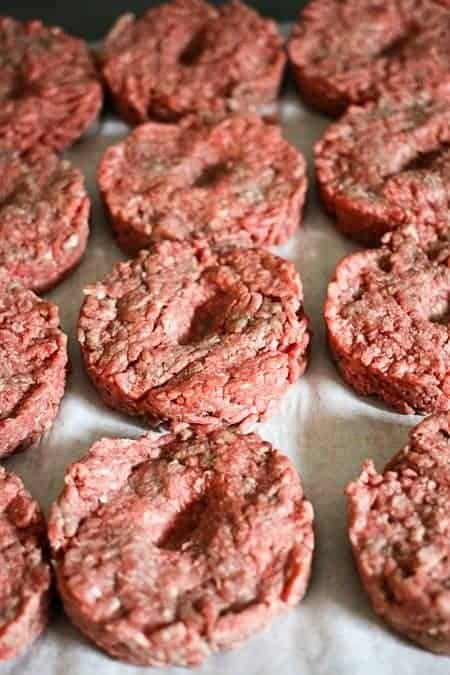
The thumb print is non-negotiable in my house. Making that indentation in the burger prevents doming while it cooks. I’m sure you’ve seen perfectly flat burgers become curved or fat in the middle on the grill.
It’s not just aesthetic, though… When they pouf up in the center, the edges become crispy and overdone before the center can cook through.
Banish wonky burgers and get an evenly grilled burger every time with the simple addition of pushing your thumb 1/3 of the way down into the shaped burger before removing it from the cookie cutter mold.
Freeze them good and solid before attempting to move them to a bag. This helps them keep the shape you made them.
Stack them with squares of parchment in between so they don’t stick before putting them in a resealable zipper top freezer bag. Be sure to get as much air out of the bag as possible when sealing it to help prevent freezer burn.
If you’re really concerned about freezer burn, you can help prevent it a little more by tightly rolling those filled freezer bags in sturdy paper bags or freezer paper.

Make your Own Frozen Patties for Grilling Hamburgers
Rate RecipeIngredients
- 5 pounds of 80/20 or 85/15 ground beef OR home ground beef with about a 15% fat content
- parchment paper
- resealable gallon size zipper top freezer bags
- 4- inch round open topped biscuit cutter
- kitchen scale that measures in ounces
Instructions
- Lay a sheet of parchment paper on a cookie sheet. Cover your kitchen scale with a layer of plastic wrap to keep it clean. Lay the round biscuit cutter on top of the scale. Turn on and tare your scale.
- Measure 5 ounces of ground beef into the round cutter. Gently press it down so that it is evenly distributed in the mold. Use your thumb to press an indentation that goes about 1/3 of the way into the patty. This indentation will help keep the burger from doming when it cooks. Lift the biscuit cutter. The patty will be likely to stay in the cutter at this point. That’s fine! Move the cutter over to the parchment lined cookie sheet and push the patty out onto the parchment. Return the cutter to the scale and repeat with the rest of the meat. If you fill the sheet, you can lay another piece of parchment on top of it and continue on until you’ve used all the meat.
- You should end up with 16 patties.
- Transfer the tray to the freezer overnight, or until the patties are frozen solid. Cut the parchment in a grid so that each patty has its own square. Stack each patty with its square into a resealable gallon size zipper top freezer bag. Label each bag with the type of beef used and the date. Freeze for up to and use within 3 months for best quality.
- To Grill or Pan-Fry:
- Season the desired number of frozen patties with salt and pepper on both sides. Preheat grill or frying pan to medium high. Lay the patties down over direct heat and don’t mess with them! After 6 minutes or so (each grill and stove is different, so watch for the visual cues), you’ll begin to see juices starting to pool on top of your burger. Flip them gently and leave them alone again. At about 3 minutes, your burger should be medium, but do yourself a favour and use an instant read thermometer to check!
Burger Doneness Temperatures:
- Rare: 120° to 125°F
- Medium Rare: 130° to 135°F
- Medium: 140° to 145°F
- Medium Well: 150° to 155°F
- Well: 160° to 165°F
Nutrition
Nutritional information is an estimate and provided to you as a courtesy. You should calculate the nutritional information with the actual ingredients used in your recipe using your preferred nutrition calculator.
did you make this recipe?
Make sure to tag @foodiewithfam on Instagram and #hashtag it #foodiewithfamily so I can check it out!
These are the cutter set and kitchen scale that I own and use at least three times a week. These are both Amazon affiliate links.


Reader's Thoughts...
Kellia says
Do you cook them starting with the thumb print side down?
Rebecca says
Hi Kellia- I usually actually start them thumbprint up, but I’m not sure it makes a huge difference. It’s just to help keeping the shrinkage to a minimum.
Jaime says
Thank you for the how to on these! I was spending a lot on frozen burgers at the store and my two teen sons were eating through them too fast! This works great and so much cheaper.
Rebecca says
Thank you for taking the time to rate this recipe tutorial, Jaime. I’m so glad it’s working out for you. 🙂
Debbi Thomas says
I keep my scale in a ziplock bag to keep it clean. I do all of my cooking / mixing by weight. I am disabled and it is just easier. Thanks for the tips.
Rebecca says
That is also a great tip, Debbi! Thanks!
Miswel says
Just started freezing my own and found here for the instructions for cooking them … I made mine using a donut pan and it even puts the indent already in it.
Rebecca says
That’s a great idea!
Joyce Beck says
Do you put them on the grille frozen?
Rebecca says
You betcha! Straight onto the grill from the freezer.
Diane L. Franzen says
When using the cookie cutter, do you press the meat into the cutter? The instructions above don’t elaborate, just says don’t handle a lot.
Rebecca says
Hi Diane- Yes. The round cutter is meant as a form.
Joe G. says
I went to a tag sale at an older person’s home and there was the Tupperware hamburg press and containers with lids just like my mom had when I was a kid. Each round container can hold up to 1/2 pound of ground beef and they stack interlocked. For extra protection in the freezer I put the stack in a gallon size freezer bag. Easy to separate and cook the number you want.
Rebecca says
That’s pretty handy, Joe! I haven’t seen any of those in my neighborhood tag sale.
Deanna says
Oh man. I googled freezing burgers because I wanted to look at some instructions to confirm what I was guessing the correct process would be, didn’t even realize I was on your blog until I saw your replies in the comments lol.
Thanks for the how to and stuff.
Adnan says
Excellent idea and guide. But there is a gray area for me. (real ignorant in kitchen) Should I let them thaw before pan-frying or put them solid frozen? And when to season them -before or after thawing?
Matt Robinson says
This really is such a great idea. We were in the store yesterday debating whether or not to buy prepacked ones, and I’m glad we didn’t now. Why didn’t we think of this before? Thanks!
Rebecca says
Thanks, Matt!
Anna says
Excellent tips!
In my house a while we do frozen hamburgers and is highly recommended ago!
jaye says
Is there a reason you don’t add salt and pepper to your patties before freezing?
Deitan says
I’m not sure if this has anything to do with what Rebecca’s reasoning is, but salting meat ahead of time pulls moisture out. That is why you wouldn’t normally salt any kind of meat until right before you are going to sear or grill it…it won’t brown as nicely, rather, it will sort of steam or ‘boil’.
Jaime says
I am wondering the same thing. When I make burgers I always shake in some worcestershire sauce and s&p. My guess would be that the salt can’t pull out the water if the water is frozen…guess I will try with a small batch and do a taste test!
applehillcottage says
When I make my burgers, I usually add chopped onions, herbs, garlic, and maybe some barbecue sauce or mustard. I guess that makes me stir it more, but we love the way they taste and don’t usually have trouble with them turning up at the ends. Will the extra additives affect freezing?
Eleanore Brickell says
I am wodnering the same about adding green onions, eggs, bread crumbs..etc..is it possible to do before freezing? thanks
Nana says
I make my own as I live alone and do not want a big box of burgers. I make mine by weighing and then wrap each in plastic wrap and store in a ziplock. The wrap allows me to take out one at a time without being stuck and helps prevent freezer burn. I wonder if a tuna can with ends cut out might work as a mold.
Rie says
Nana……if you find a tuna can that you can get both ends off, please post!!! A lot of cans these days (especially the cranberry sauce….don’t ewww….I know there are plenty like me out there) that is difficult/impossible to get off the second end.
CarrollWC says
I was thinking an English muffin ring might be a good size for this.
Rie says
Glad to see that I am not the only person OC with her home made burgers. I too measure with a scale, but I use a large jar lid (although I am liking the cookie cutter idea) lined with plastic wrap, then add the meat and “thumb print”, wrap then up, line them up on a cookie sheet, freeze solid and THEN I put them in the freezer bag. Beats the frozen hockey pucks butts!!
cindy bigsby says
great idea, you could also prep them ahead of time w your marinade mix soaked into them before you freeze patties so all you need do is grill without added condiments.
Amber says
Commercial frozen patties are the WORST… thanks for the tutorial!! I’m going to stock my freezer… it will be warm enough to grill soon (fingers crossed)!!