Visit our Bread Recipes page for more wonderful homemade bread recipes!
I have this little self-indulgent thing I do every time I go REAL grocery shopping. By real grocery shopping, I mean the kind where my husband stays home with the boys so that I don’t have to fend off requests for everything from Japanese rice crackers to day-glo cereals to a giant ham to adult diapers (because can you even imagine how hilarious it would be if we bought those to wear to youth group over our pants?)
My routine is this… I drive to the nearest biggish town and hit Aldi first where I probably look for all the world like a doomsday prepper with the amount of tuna and chili beans I’m buying (my kids snack on chili beans. I know. I KNOW. We’re weird.) I move onto The Wal-Marts where I again look like I’m stocking up for armageddon by virtue of the sheer volume of toilet tissue I’m purchasing. These exercises in embarrassment over, I move onto Wegman’s where I get beautiful produce, meats, jugs of olive oil and one little thing just for me. I always get myself a little roll from the bakery section and it’s almost always a crusty olive roll.
When I’ve crammed our little gas-efficient, tiny clown car with all the groceries I think we’ll need for three or four weeks (because I can take the bonnie wee thing instead of the massive purple van when I go solo), I sit in the car, listen to the classical music station and eat my crusty roll to reward myself for not filling my cart entirely with avocados and dark chocolate.
Now, I’ll tell ya, I like those crusty rolls perfectly well, but they’re so crusty, I can’t see making a sandwich on them unless I add some steel reinforcement to my teeth. I can eat a roll just fine, but if you add fillings you have to bite through, I think it might take more jaw work than I want to put into a meal because I like my sandwiches piled up-to-the-sky with innards.
I kept thinking about how much I’d love to have sandwich bread studded with those briny, fabulous olives, though, so the only recourse was to make it mahself. So I did.
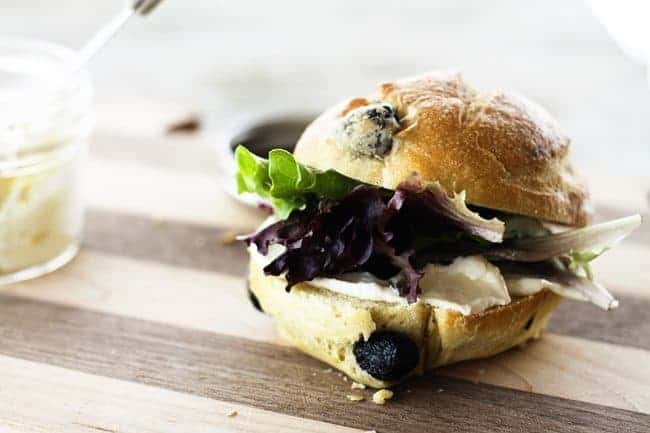
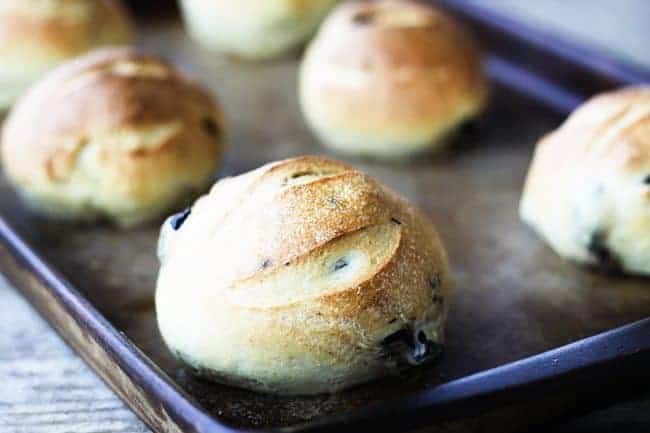
The result was a seriously happy moment. Chewy outer crust, yielding and soft inner crumb and enough oil-cured olives to make my olive-loving heart sing.
The key to making these rolls is in the forming of them. Duh, right? No really, there is a technique that gives you that bakery-perfect round shape with the smooth top (with just a few olives lurking enticingly beneath the surface.) I had my eldest son shoot a quick video to show you how it’s done, it was a last minute idea and done with my iPhone, so please forgive any quality issues.
You’re really going to want to make these, both because there’s really not a happier vehicle for a sandwich and because you will most definitely want them on hand for a recipe I’m sharing in the next week or so. It involves feta, roasted garlic, and lots and lots of happy sighs.
In the meantime, I’d suggest you whip up a batch of these to make some very marvelous sandwiches. My sister thought they’d be great piled high with garden veggies… Clearly we’re dreaming of spring. I think they’d be fab for mopping up pasta sauce or stuffing with roasted turkey or chicken, cheese, and lots and lots of lettuce. How would you serve these?

Black Olive Sandwich Rolls
Rate RecipeIngredients
- 4 cups all-purpose flour 1 pound, 1 ounce, by weight
- 2 cups semolina flour 11½ ounces, by weight
- 3 teaspoons SAF or instant yeast
- 3 teaspoons kosher salt
- 2 tablespoons sugar
- 4 tablespoons extra virgin olive oil
- 2 cups lukewarm water 16 ounces, by weight or volume
- 1 1/2 cups pitted oil-cured or kalamata olives broken up coarsely with your hands
- 1/2 cup water
- 1/2 teaspoon cornstarch
Instructions
To Mix Dough By Hand:
- Add all ingredients except for olives, cornstarch and 1/2 cup of the water to a large mixing bowl and stir together with a sturdy wooden spoon until you form a shaggy but cohesive dough. Let the dough rest for 30 minutes, covered with a clean towel. Turn out onto a lightly floured counter top and knead until smooth and elastic, about 10 minutes. Transfer dough to a clean bowl, cover with a damp towel and let rise in a warm, draft-free place until doubled in size, about 2 hours.
To Mix Dough By Stand Mixer:
- Add all ingredients except for olives, cornstarch and 1/2 cup of the water to the work bowl of your stand mixer fitted with the dough hook. Turn mixer onto the lowest setting and mix until a shiny, elastic dough forms. Remove the bowl from the mixer, cover the bowl with a damp towel and let rise in a warm, draft-free place until doubled in size, about 2 hours.
To Mix Dough By Bread Machine:
- Add all ingredients except for olives, cornstarch and 1/2 cup of the water to the pan of your bread machine that has been fitted with the dough paddle(s). Set the bread machine on the dough setting and press start. When the cycle is completed, proceed with shaping…
To Shape the Rolls:
- Line two baking sheets with silpats or parchment paper. Set aside.
- Turn the dough out onto a clean and very lightly floured surface or silicone mat. Roll it out into a rectangle that is about 12-inches by 18-inches. Scatter the olives over the surface of the dough, leaving about an inch clear of olives on the side farthest from you.
- %https://www.foodiewithfamily.com/wp-content/uploads/2013/03/Black-Olive-Rolls-1.jpg
- Gently lift the edge closest to you and fold away from yourself over the olives.
- %https://www.foodiewithfamily.com/wp-content/uploads/2013/03/Black-Olive-Rolls-2.jpg
- Continue to carefully lift and roll the dough away from you until you have a long tube. Pinch the seam closed.Use a bench knife or serrated knife to cut the dough into 16 equally-sized pieces.
- %https://www.foodiewithfamily.com/wp-content/uploads/2013/03/Black-Olive-Rolls-3.jpg
- %https://www.foodiewithfamily.com/wp-content/uploads/2013/03/Black-Olive-Rolls-4.jpg
- Hold a piece of dough with the cut sides out. Use your thumbs to pull the top of the dough over the cut sides toward the bottom. Push that up under the roll toward the center, rotate the dough ball a half turn and repeat. Put the dough ball on the counter and cup your hand around it, rotating in one direction until the top of the dough is taut. (See the video in the blog post for an example of how to do this.) Place this on your lined baking sheets. Repeat, leaving plenty of room between the rolls for expansion in rising and baking.
- %https://www.foodiewithfamily.com/wp-content/uploads/2013/03/Black-Olive-Rolls-5.jpg
- Cover the rolls with a tea towel and let rise in a warm, draft-free place for about 30 minutes, or until they look a little puffy.
- While they rise, use a fork to whisk a small amount of the water into the cornstarch in a microwave safe container or a small saucepan, forming a paste. Use the fork to whisk in the remaining water and microwave on HIGH for 30-60 seconds or boil until it is glassy.
- %https://www.foodiewithfamily.com/wp-content/uploads/2013/03/Black-Olive-Rolls-6.jpg
- Preheat the oven to 400°F. Brush the rolls with the cornstarch glaze and use a sharp knife to make three to four cuts of about 1/8-inch deep each to the top of the roll. I like to do a scallop pattern, but you could also do a tic-tac-toe pattern. This allows the roll to expand while baking without tearing that beautifully taut top you worked so hard to create.
- Bake for 23-26 minutes, or until deep golden brown. Remove the pan from the oven and transfer the rolls to a wire rack to cool completely before slicing. These are good for up to three days.
Nutritional information is an estimate and provided to you as a courtesy. You should calculate the nutritional information with the actual ingredients used in your recipe using your preferred nutrition calculator.
did you make this recipe?
Make sure to tag @foodiewithfam on Instagram and #hashtag it #foodiewithfamily so I can check it out!


Reader's Thoughts...
Shari-Tickled Red says
These have been on my mind all week! Oh my love of bread and olives {swoon}
Eileen says
Rebecca, these rolls look just perfect. I am on a lowish carb diet and I just want you to know you’re killing me!
Abbe@This is How I Cook says
These sound great. My sandwich filling would include more olives in the form of a muffaletta filling plus pepperoni, lots of onions and a bit of goat cheese. ooh-I made myself hungry and I just used the last of my olives making an olive tapenade for my son who loves olives.
beth says
love the idea and definitely want to try these. i’m missing something in the directions, though – egg whites? should that say olives, maybe? thanks!
Rebecca says
Nice catch, Beth! I tried to save myself some time copying the instructions for the dough from another recipe of mine that called for -you guessed it- egg whites and toppings. Oy! I’ve updated the recipe and learned to triple check myself. 🙂 Thank you!!!
beth says
ah, thanks! i may or may not share these when i make them. 🙂
Katrina @ Warm Vanilla Sugar says
Mmm this sounds awesome! Love this recipe.
Licia says
You are absolutely killing me! My mouth is watering and my eyes are scrunched up as I dream of eating one of these. Dream, I say, for I am still in wheat free folly.
*sigh*
I WILL try these someday! I WILL! I WILL!!
Kim @ Soliloquy Of Food & Such says
Ooooo. I can’t wait to make these. You have more restraint than I; we pick up an entire 3Olive Loaf (black, green & kalamata olives), then the hubs & I tear into it ~savages~ on the ride home, while it’s still warm.
Lisa@The Cutting Edge of Ordinary says
I see a big bowl of homemade mariana and these rolls being dunked into it! Yum! Loved the video too!
Nicole says
These are seriously gorgeous. I never fail to mess rolls up, so I’m anxious to try these little guys out! Thanks 🙂
Cassie | Bake Your Day says
These are gorgeous, Rebecca. We love black olives (and bread) around here. Great post!
Cookin Canuck says
Ah yes, there is something to be said for real (kid-less) grocery shopping.
These rolls are gorgeous and I can imagine they’d dress up any sandwich beautifully.
Liz @ The Lemon Bowl says
These are my husband’s favorite!!!!