Pain au Chocolat or French Chocolatines are many layered, shatteringly flaky, buttery, deeply browned pastry stuffed with batons of semi-sweet or dark chocolate. This classic French pastry is worth learning how to make!
Visit our Bread Recipes page for more fantastic homemade breads!
Nearly all of my most vivid memories come back to food. I’m willing to bet that this says something about my psyche, but there it is.
The basket of dinner rolls my grandma would tuck aside for me at Thanksgiving, the drippy pudding pops that my sibs and I would ‘sneak’ from the freezer (with our parents’ permission).
My mom’s lumpia, my dad’s zucchini burgers, my stepmom’s oatmeal bread, the Pain au Chocolate or French Chocolatine* that I ate near my school in France… These are all tastes so imprinted in my mind that if I take just one silent moment with closed eyes, I can almost actually taste them.
*They are referred to as Chocolatines in some areas of France and part of Canada.
Mercy. Those Pain au Chocolat.
They were not the fanciest looking pastries in the case by a mile, but the glossy, dark brown, flaky, dark chocolate stuffed rolls had my heart from the second I saw them. They looked like a slacker croissant…
There were no tapered ends and there was no shell shape. It was a simple rectangle of buttery puff pastry wrapped around two long rods of good dark chocolate and baked until it was positively shiny and caramelized to a deep, almost rosewood brown.
And this was a standard school kid’s breakfast? This is why I loved France.
It took a while, when I got home, to work up the culinary confidence to attempt pastry in the style of La Belle France. Once I did, though, I wondered WHY oh WHY I waited.
I need to hit you with a hard truth here. You may be thinking I’m nuts for putting the time into making my own Pain au Chocolat when I can just roll into Starbucks and grab one.
A) They call them chocolate croissants even though the label says Pain au Chocolat. Gimme a break. Pedantic? Yes, but seriously.
B) Homemade ones are just plain better in every conceivable way. If you say ‘pshaw’ to that, go ahead and try making them and comparing them to a Starbucks.
I’ll wait right here. Eating glorious, homemade Pain au Chocolat.
Pain Au Chocolat Recipe
It is NOT hard. It is simply a matter of following instructions.
I know it can be intimidating, but I’m breaking it down for you into tiny, digestible steps today. Let’s get a couple of things out of the way before we start…
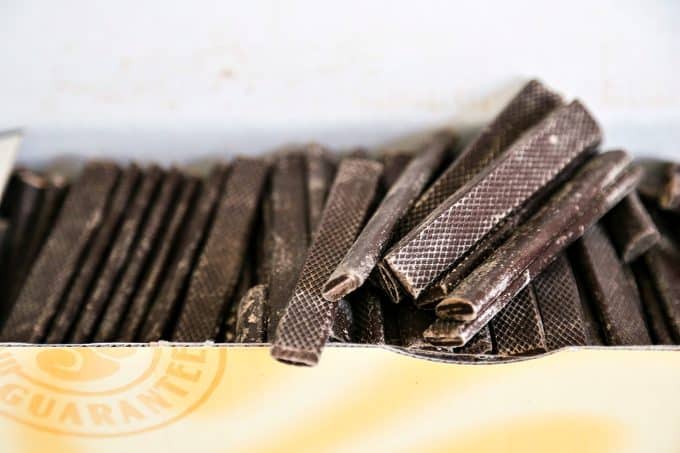
While those gorgeous chocolate batons are the most traditional way to deliver the veins of molten chocolate to the center of your flaky, caramelized pastry, don’t think for a second that all is lost if you can’t find them (Pssst. Amazon sells the chocolate batons for pain au chocolat.)
You can break off segments of good quality dark chocolate bars if you’d like. Word to the wise: using chocolate bars instead of the batons ends up being significantly more expensive in the long run.
There is NO substitute for butter. None. Nada. Negatory. No shortening. No coconut oil. No tub margarine.
I’ve heard it said that you can make this with vegan butter sticks, but I haven’t tried it, so I can’t possibly recommend it. We’re talking about traditional, from-scratch French pastry here, and the French? They love that butter.
Speaking of butter -because there is a lot of it in today’s recipe- please don’t use salted butter. You want to control the amount of salt going into the Pain au Chocolat, and you just plain can’t if you start with salted butter.
Use unsalted butter. Trust me.
Please note that you’ll be working with cold butter in every step of this recipe except the tail end of it where you let the prepared pastries sit at room temperature while the oven heats and then while baking.
Okay. Are we ready? Let’s roll up our sleeves and look at the 4 main steps required to make Pain au Chocolat.
Step 1: Make the Dough
Make the dough. This simple yeast dough is enriched with just a little bit of butter.
I find that it is easiest to mix the softened butter in with the yeast, water, sugar, and about half of the flour. That way, you can be certain the butter disperses evenly through the dough.
A stand mixer makes light work of the job, but you can go seriously old-school and do all of the mixing by hand if you so desire. Once you have a homogenous mixture, add in the rest of the flour and mix until a dough forms that pulls away from the edges of the bowl.
If you’re using a stand-mixer, you can knead this dough with a dough hook. If you’re mixing by hand, you will turn the dough out on to a clean counter and knead until smooth and elastic.
Place the dough in a lightly greased bowl or lightly grease the stand-mixer’s bowl and return the dough to that. Cover with a clean tea towel and let rise for about an hour, or until puffy.
If your room is cool, you may find this takes up to another hour longer. Use cooking spray to spritz the inside of a gallon sized zipper top bag.
Turn the dough out onto the counter, flatten it gently with the palms of your hands, and fold in thirds like a letter. Slide the dough into the prepared bag, zip the bag shut, and place into the refrigerator for at least 2 hours, but up to 24 hours.
Step 2: Prepare the Butter
While the dough is chilling, prepare your butter. This can be done as soon as you’ve placed the dough in the refrigerator, if you’d like.
Cut 2 half-cup sticks of butter in half lengthwise. This will give you four long rectangles of butter.
Set it aside. Lay a 12-inch or longer piece of waxed paper or plastic wrap.
Sprinkle the plastic wrap thoroughly with flour. Lay the sticks of butter side by side (touching), sprinkle with more flour, and lay another piece of waxed paper or plastic wrap over the top.
Gently smack with a rolling pin until the butter becomes malleable, then roll it out until it is approximately 6-inches by 9-inches. Wrap well with the waxed paper or plastic wrap with which you rolled it and return it to the refrigerator or at least an hour or until you’re ready to deal with the dough.
Step 3: Create the Pastry
Take the refrigerated dough from the bag and place onto your counter. Roll out until it forms a rectangle that is approximately 10-inches by 20-inches.
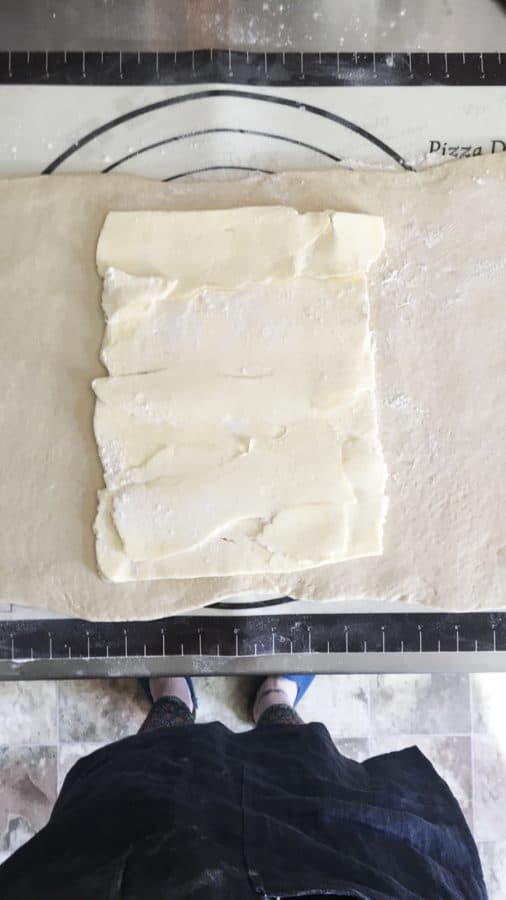
Take the refrigerated butter from its wrapper and center the butter on top of the dough. This will leave you with about 1/3 of the dough open, followed by 1/3 covered by butter, followed by another open 1/3 of dough.
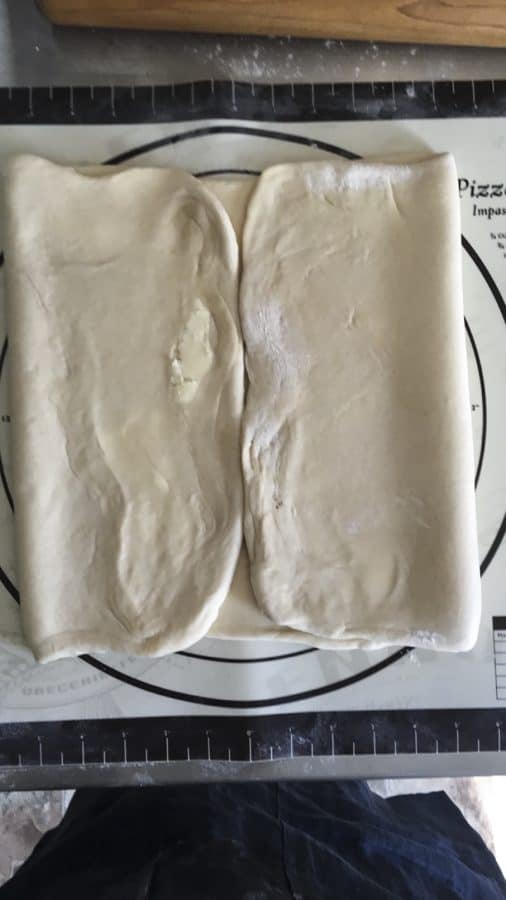
Fold an open side of dough over the butter, then fold the other open side of dough over the previously folded side of dough, much like you’re folding a letter into thirds. Now that the dough is folded, pinch the edges together thoroughly, sealing the butter into the dough completely.
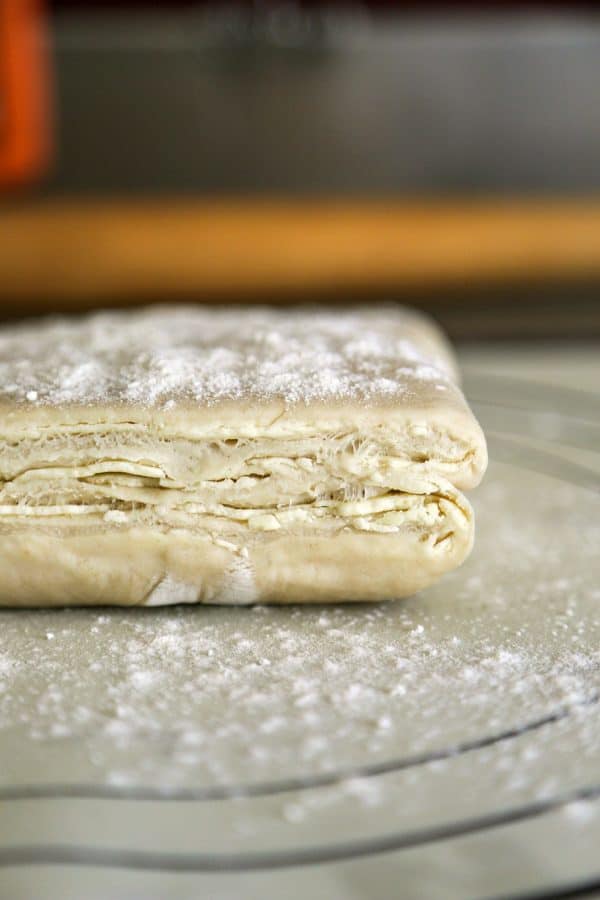
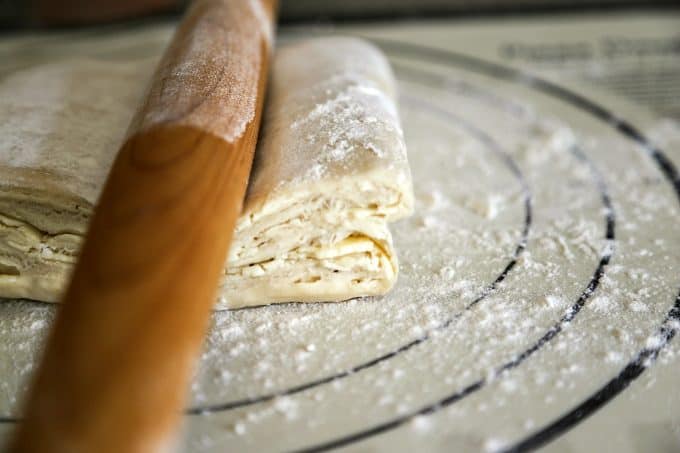
Roll the dough out into a 10-inch by 24-inch rectangle. This time, fold both ends in toward the center to meet in the middle, then fold that in half like closing a book.
Wrap this up with floured plastic wrap and return the whole thing to the refrigerator for at least 2 hours but up to 7 days.
Step 4: Put it All Together and Bake
Remove the dough from the refrigerator, unwrap, cut in half, re-wrap half and return it to the refrigerator. Roll out the remaining half of the dough into a rectangle that is roughly 9-inches by 25-inches.
Use a pizza cutter, bench knife, or sharp paring knife to trim the sides neatly to an 8-inch by 24-inch rectangle, pressing straight down with the knife. Do not drag the knife through the pastry.
Cut the dough in half lengthwise -again cutting straight down- then crosswise. Cut the long rectangle quarters into half again, yielding 8 rectangles that are about 4-inches by 6 inches each.
Here’s a quick video to show the process of rolling out, cutting, and forming the Pain au Chocolat.
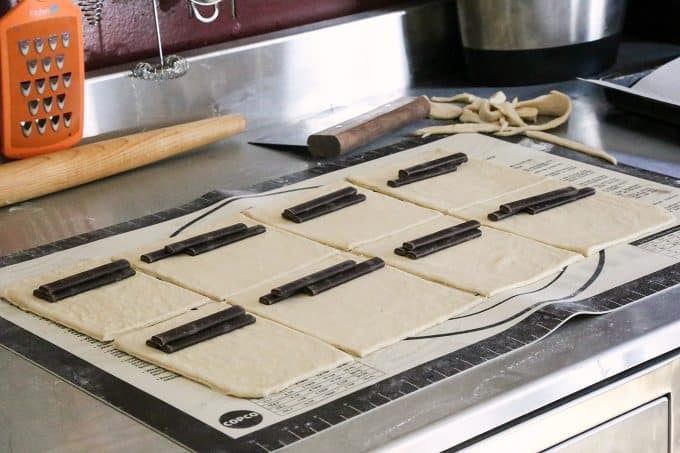
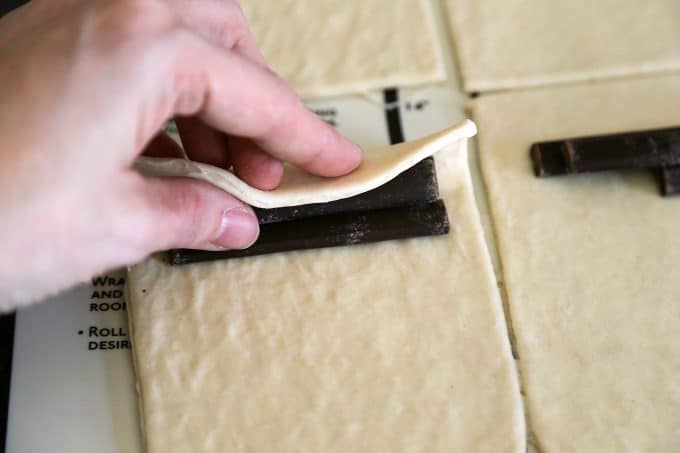
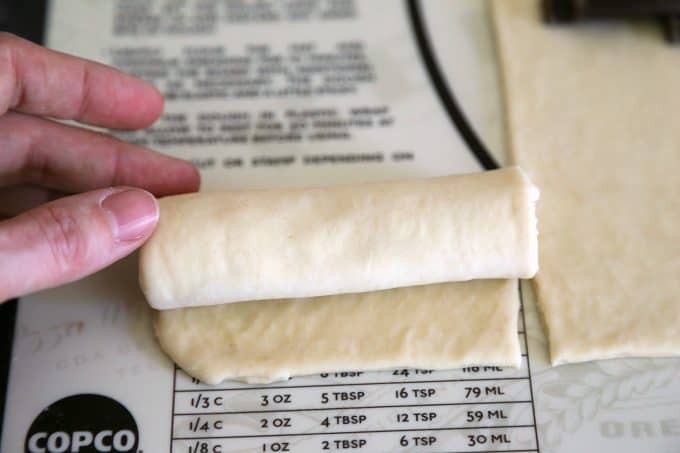
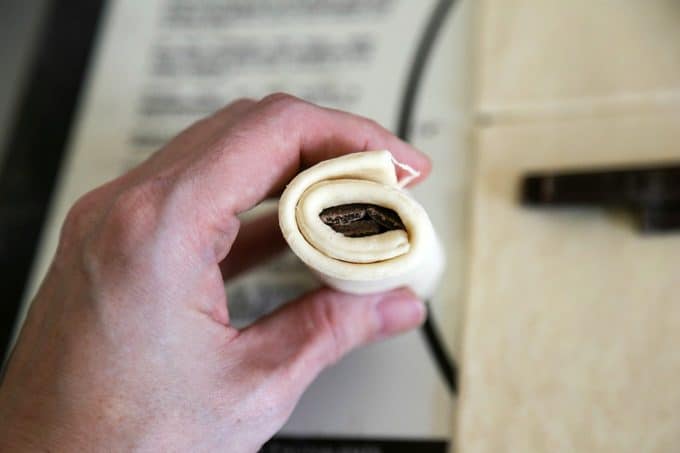
Lay 2 to 3 chocolate batons near the end of each rectangle and roll the dough around them.
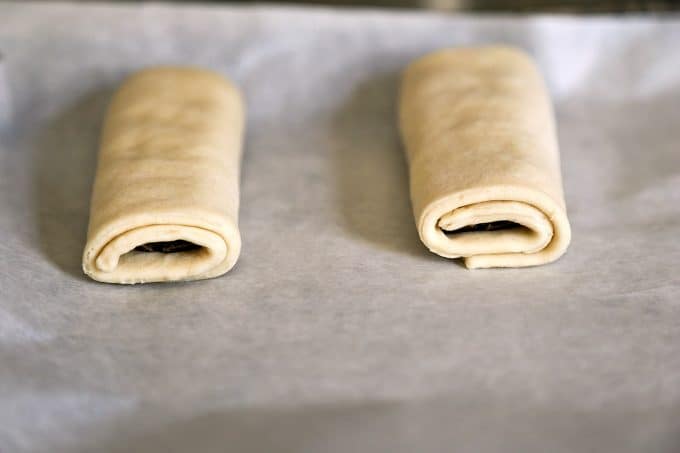
Lay the tube, seam side down, on a parchment or silpat lined half-sheet pan, leaving at least 2 to 3 inches of free space all the way around. Gently press the tube to flatten.
A half sheet pan should comfortably fit 8 unbaked pain au chocolat. Lay a clean tea towel over the pan and let rest at room temperature for 30 minutes, or until slightly puffy.
Preheat the oven to 425F. Whisk together a large egg with a pinch of salt until even in colour.
Brush the tops of the pain au chocolat with the egg wash. Bake for 15 to 18 minutes, or until a the pastry is puffed, set, flaky, and caramelized to a deep rosewood brown.
Let the pastries rest on the pan for 5 minutes before transferring to a cooling rack. These are always best when eaten slightly warm on the day they were made, but if there is some weird circumstance in which they’re not all eaten immediately, I have loved them the day after they were made, too.
How to plan the timing when making pain au chocolat
You’ll notice there are a couple of places where you can have a 24 hour or longer wait time between steps. The first place you can do this is when you stash your risen dough in the refrigerator in a greased bag. You need for it to be in there for at least 2 hours, but up to 24.
The second time you can stretch things out is after you’ve added the butter to the dough to create the pastry, rolled it out, folded it like a book, and returned it to the refrigerator. At this point, you’re looking at at least another 2 hours but up to 7 days.
That actually makes this recipe pretty accommodating since you can do the bulk of the work up to 8 days in advance of the time you’d like to bake it.
Here is a sample timeline of what it might look like to make the pain au chocolate in the shortest amount of time:
8am Tuesday, April 5th: make dough
9:15am Tuesday, April 5th: refrigerate dough, form and refrigerate butter
11:30am Tuesday, April 5th: Roll out dough, laminate butter into dough, roll out again, fold, refrigerate
1:30pm Tuesday, April 5th: Roll out half of the dough, form pain au chocolate, let it rise at room temperature
2pm Tuesday, April 5th: bake the pain au chocolate
3pm Tuesday, April 5th: EAT!
Here is a sample timeline of what it might look like to make the pain au chocolate in the longest amount of time possible:
8am Tuesday, April 5th: make dough
9:15am Tuesday, April 5th: refrigerate dough, form and refrigerate butter
9:15am Wednesday, April 6th: Roll out dough, laminate butter into dough, roll out again, fold, refrigerate
9:15am the following Wednesday, April 13th: Roll out half of the dough, form pain au chocolate, let it rise at room temperature
9:45 am Wednesday, April 13th: bake the pain au chocolate
10am Wednesday, April 13th: EAT!
Pain au Chocolat

Pain au Chocolat - French Chocolatine
Rate RecipeIngredients
For the Dough:
- 1 1/2 cups whole milk
- 1/4 cup granulated sugar
- 4 1/2 cups unbleached all-purpose flour
- 2 teaspoons instant or active dry yeast
- 2 teaspoons kosher salt
- 2 tablespoons unsalted butter softened
For the Butter:
- 2 sticks cold unsalted butter
- all-purpose flour
Additional Ingredients for the Pastry:
- between 32 and 48 dark chocolate batons
- 1 large egg beaten
- a pinch of kosher salt
Instructions
To Make the dough:
- Mix the softened butter in with the yeast, milk, sugar, salt, and about half of the flour in the bowl of a stand mixer fitted with a batter blade. Once you have a homogenous mixture, add in the rest of the flour and mix until a dough forms that pulls away from the edges of the bowl. Lightly grease the stand-mixer's bowl, form a tight round of dough, return the dough to the bowl, and cover with a clean tea towel. Let rise for about an hour, or until puffy. If your room is cool, you may find this takes up to another hour longer.
- Use cooking spray to spritz the inside of a gallon sized zipper top bag. Turn the dough out onto the counter, flatten it gently with the palms of your hands, and fold in thirds like a letter. Slide the dough into the prepared bag, zip the bag shut, and place into the refrigerator for at least 2 hours, but up to 24 hours.
Prepare the Butter:
- While the dough is chilling, prepare your butter. This can be done as soon as you've placed the dough in the refrigerator, if you'd like. Cut 2 half-cup sticks of butter in half lengthwise. This will give you four long rectangles of butter. Set aside. Lay a 12-inch or longer piece of waxed paper or plastic wrap. Sprinkle thoroughly with flour. Lay the sticks of butter side by side (touching), sprinkle with more flour, and lay another piece of waxed paper or plastic wrap over the top. Gently smack with a rolling pin until the butter becomes malleable, then roll it out until it is approximately 6-inches by 9-inches. Wrap well with the waxed paper or plastic wrap with which you rolled it and return it to the refrigerator or at least an hour or until you're ready to deal with the dough.
Creating the Puff Pastry:
- Take the refrigerated dough from the bag and place onto your counter. Roll out until it forms a rectangle that is approximately 10-inches by 20-inches. Take the refrigerated butter from its wrapper and center the butter on top of the dough. This will leave you with about 1/3 of the dough open, followed by 1/3 covered by butter, followed by another open 1/3 of dough. Fold an open side of dough over the butter, then fold the other open side of dough over the previously folded side of dough, much like you're folding a letter into thirds. Now that the dough is folded, pinch the edges together thoroughly, sealing the butter into the dough completely. Roll the dough out into a 10-inch by 24-inch rectangle. This time, fold both ends in toward the center to meet in the middle, then fold that in half like closing a book. Wrap this up with floured plastic wrap and return the whole thing to the refrigerator for at least 2 hours but up to 7 days.
Putting it All Together and Baking:
- Remove the dough from the refrigerator, unwrap, cut in half, re-wrap half and return it to the refrigerator. Roll out the remaining half of the dough into a rectangle that is roughly 9-inches by 25-inches. Use a pizza cutter, bench knife, or sharp paring knife to trim the sides neatly to an 8-inch by 24-inch rectangle. Cut the dough in half lengthwise, then crosswise. Cut the long rectangle quarters into half again, yielding 8 rectangles that are about 4-inches by 6 inches each.
- Lay 2 to 3 chocolate batons near the end of each rectangle and roll the dough around them. Lay the tube, seam side down, on a parchment or silpat lined half-sheet pan, leaving at least 2 to 3 inches of free space all the way around. Gently press the tube to flatten. A half sheet pan should comfortably fit 8 unbaked pain au chocolat. Lay a clean tea towel over the pan and let rest at room temperature for 30 minutes, or until slightly puffy.
- Preheat the oven to 425F. Whisk together a large egg with a pinch of salt until even in colour. Brush the tops of the pain au chocolat with the egg wash. Bake for 15 to 18 minutes, or until the pastry is puffed, set, flaky, and caramelized to a deep rosewood brown. Let the pastries rest on the pan for 5 minutes before transferring to a cooling rack. These are always best when eaten slightly warm on the day they were made, but if there is some weird circumstance in which they're not all eaten immediately, I have loved them the day after they were made, too.
Nutritional information is an estimate and provided to you as a courtesy. You should calculate the nutritional information with the actual ingredients used in your recipe using your preferred nutrition calculator.
did you make this recipe?
Make sure to tag @foodiewithfam on Instagram and #hashtag it #foodiewithfamily so I can check it out!
Are you looking to buy the chocolate batons? You can buy them here!




Reader's Thoughts...
Daina says
I love your page. But every time I try one of your bread recipes, that I follow to a TEE, it ends up in disaster. Tried the pain au chocolat and ended up with useless dough stuck to the recommended wax paper. At least I didn’t have to toss out the chocolate. Did you really make this recipe as you’ve written it?
Rebecca says
Hi Daina- I’m sorry you’re having difficulty with this one. I definitely made and make this recipe as written. In fact, I make it on a pretty regular basis. 🙂
I’m trying to figure out where you had dough in contact with waxed paper, because the only recommendation for using waxed paper is when you roll out the butter block. When baking, it should be (as indicated in the recipe card) on parchment or silicone baking sheets. Parchment paper is designed for baking, waxed paper is most definitely not.
Please weigh back in and let me know if this might explain the issues you had.
Kat says
It doesn’t say when to add the salt, so I guess I did it wrong. I added it with the sugar, yeast, milk, and flour, but this just never rose at all, so maybe that was the problem. I know my yeast was fine because I used it in a different recipe on the same day with no issue, so maybe the salt messed it up, but I had no way of knowing when to add it other than to guess. After that, I kept trying, but probably should have just tossed the dough and found a new recipe. I felt like I got lost each time I read a new step because of how long winded each step was. I’ve made croissants plenty of times, so I was able to rely on my experience when I’d get lost in the paragraph of writing which amounted to “fold the dough in fourths,” but I don’t ever remember a dough so tough. The end result reflected that toughness. They tasted fine, but the texture wasn’t right and since I must have screwed it up right at the start, it was a frustrating use of time. I guess I’ll have to keep looking.
Rebecca says
Hi Kat- You added the salt at just the right time. (I went in and fixed the printable. Thank you for that heads up!) Something else must have gone wrong. Let’s see if we can work through this for you, because I make this recipe on average of once a month and it works each time. As the recipe originates from King Arthur Flour’s baking experts, I’m also pretty confident that it’s accurate. When you measure your flour, do you measure by weight or by volume? And what was the room temp when you had the dough rising? Dough that’s made with milk often takes far longer to rise and hydrate well. If the room was cool (or your milk was fridge-temp going in) it may have taken a lot longer for the yeast to become active. If you are up to giving it another go, I wouldn’t turn it out of the bowl until it shows signs of activity and looks puffy.
As for the wordiness, it’s there for folks who have never tried baking croissants, and I stand by that as well. 🙂
Marc says
I have to say these look amazing. I had made pain au chocolat two weeks ago with a different recipe and they were pretty close but not wow. Because of that I decided to keep looking and found this recipe.
Sorry to say but they did not turn out good. It was more like chocolate bread and not what should be a delicate pastry.
Back to the drawing board
Rebecca says
It sounds like something went wrong in the process for you, Marc, as this should definitely not be chocolate bread. How fresh was your laminated dough? Did you make it from scratch or use purchased puff pastry? Did you use enough pastry cream?
Marisa says
Can this be frozen.
Rebecca says
Yes, but I would bake before the final rise, then thaw allow to rise, and bake.
MomO4 says
I would like to freeze this. Please, will you explain, at what temp would you bake that first time & for how long?
Rebecca says
Hi MomO4. I would go so far as to form the pain au chocolats (make the dough, roll it out, cut it, roll around the chocolate batons) and place them on parchment paper, then freeze until solid, and transfer to a freezer bag until the day before you’d like to bake them. After that, you’ll want to place on a parchment lined sheet pan and thaw in the refrigerator overnight before allowing the final rise and baking as described in the recipe!
Steph G says
Did you mean “freeze” before the final rise, not “bake”?! 😆
Rebecca says
Indeed I did, Steph. HAHAHAHAHAH! Good catch!
Tony says
Is it by region or whether it’s the official term?
https://www.chocolatineoupainauchocolat.com/
Helen says
Wow, I think I can do this! You have no idea how long I’ve been looking for a recipe for puff pastry that was actually understandable! Thank You.
Rebecca says
Well, THANK YOU, Helen! That makes my day!
Denyse Bean says
Sorry! Another question. It just occurred to me that the milk may have needed to be warmed. I used cold milk. Will this work? Thank you!
Rebecca says
It will work just fine! It may take a wee bit longer to rise than if you start with warmer milk, but it will work!
Denyse Bean says
Hello! The dough ingredients list milk, but the directions say water. Is it milk or water that goes in with the yeast? If water, how much, please.
Thank you! These look delish
Rebecca says
Thank you for pointing that out, Denyse! It has been fixed to read milk in both places. I’m not sure how I missed that!
Denyse Bean says
Thank you! I’m making now!
Sommer @aspicyperspective says
Beautiful pics! I need to make this yummy chocolatine recipe now!
Rie says
Going to be making these on my next stay-cation……….
Sarah says
Beautiful! I cannot wait to make these. And thank you so much for your care in providing such careful steps in the recipe. Thank you Rebecca!
Michele says
I pretty much love absolutely everything about this recipe and this lovely post! Merci!
Rebecca says
Merci, merci mille fois, Michele! I hope you enjoy them!
Tara says
Gorgeous! Definitely going on my list of things to make! Maybe Mother’s Day for myself!
Rebecca says
That sounds like a perfect self-care Mother’s Day gift!