
Love this no-knead, pantry-friendly English Muffin Bread? Visit our Bread Recipes page for more wonderful homemade bread recipes!
English muffins hold a very special place in my heart. How could you possibly not love the craggy, full-of-holes, moist bread and the crunchy, toasty bits of cornmeal stuck to the outside that transfer to your fingers when you grip it?
I love them every which way, from the English muffin pizzas my mom used to make as after-school treats, to dripping with butter and slathered with berry jam or marmalade, to topped with a fried egg and a good squeeze of rooster sauce.
I can’t imagine my life without English muffins.
Yet, as much as I love English muffins, that is how much I love this English Muffin Bread. I know, it feels kind of disloyal to say it, but it’s true. This bread is everything that an English muffin is, but more convenient. And way-hay-hay-hay less expensive.*
*Unless, of course, you’re making your own, in which case it’s no less expensive but a heckuva lot more convenient and far less time consuming. Carry on.
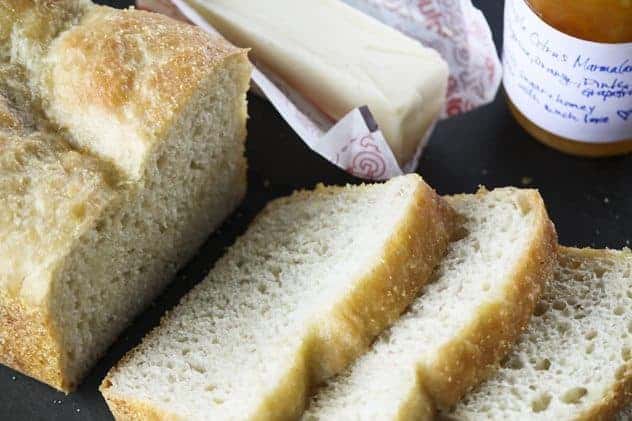
What I mean to say is that this bread has the crags, the holes, (*cough the nooks and crannies cough*) the moistness, the crunchy, toasty bits of cornmeal that transfer to your fingers and the incomparable ability to carry sinful amounts of butter and jam, or sauce and cheese, or egg and hot sauce just like its namesake muffins.
Let me tell you something. This bread is so easy, so DEAD easy, that there is no reason a complete beginning baker can’t successfully make it. It doesn’t require any exotic ingredients or specialty equipment.
The hardest part of the whole process is waiting for it to cool. Because cool completely it must. If you cut into this gorgeous, tempting, incredible bread before it is one-hundred-percent cooled, you will cry many bitter, salty tears of regret.

There is a very good scientific reason to this. The bread continues to cook and set up as it cools.
Unlike some other breads where it’s a-okay to wrench large fistfuls of warm bread and stuff them into your mouth, this will simply assume a gummy texture and stay there when sliced warm. That’s where your crocodile tears would flow.
Sigh. But if you wait, your wildest dreams will come true. Kind of like if you vote for Pedro. In short, LET IT COOL!
And then when it has finally cooled and you slice it and toast it…
There have to be little blackened parts around the edges. You can’t half-heartedly toast an English muffin, right? Well, you can’t be meek about toasting English Muffin bread, either. You have to go all-in, full-throttle; you have to commit to toasting it.
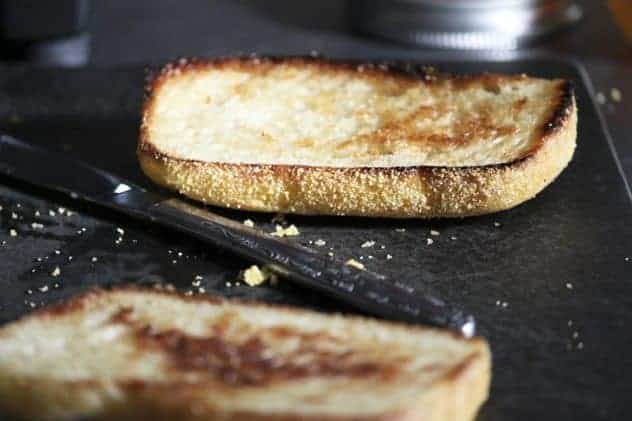
For heaven’s sake, don’t let a toaster anywhere near this bread. Toast this bread in a good puddle of melted, salted butter in a cast-iron (or other heavy-bottomed) frying pan or on a griddle over medium high heat. Does this really make a difference?
Let me answer it this way. Does breathing make a difference in your quality of life?
When it’s browned in the middle and black around the edges, flip it over with a fork. Oh, yes. It is far more hands-on than a toaster, but the results will speak for themselves.
Salted, crispy, buttery on the outside and moist and soft on the inside. We’re talking about toasty, crunchy, bready nirvana.
If this doesn’t make you happy, I just don’t know how to help you.
I never, ever make this in quantities less than four loaves, but I am feeding a regiment here with my five boys and their buddies and, let’s be honest, my husband and I can eat impressive quantities, too…
If you have a wee bird appetite, or are feeding fewer people than we are, I’ve included a halved recipe in the printable recipe. If you want to make more and freeze it, you can use the handy-dandy converter in the recipe, too!
Nothing in the method changes, so choose your level of consumption and let’s get baking!
I love this toasted under creamed peas or as English muffin bread pizza. I also love it madly with strawberry freezer jam.
Are you looking for more delicious bread based brunch or breakfast offerings? Look no further than our Bostock Pastry and Ham and Cheese Melt Egg Bake.
What you need for English Muffin Bread
-all-purpose flour
-yeast
-salt (My recipe calls for kosher salt. If you’re using table salt, reduce to 2 teaspoons.)
-sugar
-water
-cornmeal or semolina
-butter or oil
-a mixing bowl
-a mixing spoon or sturdy spatula
-a couple of loaf pans

English Muffin Bread
Rate RecipeIngredients
For a Standard Recipe (3-4 loaves):
- 5 1/2 cups warm-to-the-touch water not hot
- 2 tablespoons kosher salt
- 3 tablespoons sugar
- 2 tablespoons plus 3/4 teaspoons instant yeast or 3 packages
- 11 1/2 cups all purpose or bread flour 3 pounds 1 1/2 ounces by weight, I often do a half and half combination of the two.
For a Half-Size Recipe (1-2 loaves):
- 2 3/4 cups warm water not hot
- 1 tablespoon kosher salt
- 1 tablespoon plus 1 1/2 teaspoons sugar
- 1 tablespoon plus 1 1/4 teaspoons instant yeast or about 1 1/2 packages
- 5 3/4 cups all-purpose or bread flour 1 pound 9 ounces, by weight
Also Needed:
- Non-stick cooking spray
- cornmeal
- plastic wrap
- melted butter for brushing the bread mid-way through and after baking
Instructions
To Prepare the Dough:
- Stir all of the ingredients together by hand in a large mixing bowl (or in the bowl of a stand mixer fitted with a paddle) just until combined. The dough will be shaggy and very sticky.
- Spray a piece of plastic wrap with non-stick cooking spray and lay it loosely over the mixing bowl. Let the dough rise in a warm, draft-free place for about an hour or until it looks bubbly and puffy.
- Spray 3 standard loaf pans (8.5" x 9.5") with non-stick cooking spray and sprinkle in a fistful of cornmeal. Tilt the pans, tapping gently, until the interiors are coated with a thin layer of cornmeal. Tap out any excess cornmeal.
- Spray your hands with non-stick cooking spray and use them to divide the dough evenly between the pans. The pans should be no more than halfway full. If you need to, spray and cornmeal an additional loaf pan for any excess.
- Spray more pieces of plastic wrap with non-stick cooking spray and lay them loosely over each loaf pan. Let rise in a warm, draft-free place until the dough looks bubbly and puffy again, and has risen with the top of the dough dome just peeking above the edge of the pan.
- While the dough is rising, preheat the oven to 350°F.
It is possible to let this dough rise too long, so be sure the oven is waiting for you rather than you waiting for the oven.
- Evenly space the loaf pans in the oven and set the timer for 30 minutes. After 30 minutes, take out one bread pan at a time and brush the tops of the loaves with melted butter. When you place the bread pans back in the oven, rotate their positions from front to back. Bake for an additional 10 minutes or until they are just lightly golden brown.
- Immediately turn the loaves out onto a cooling rack and brush again with melted butter. Cool completely before slicing.
- The bread can be stored, tightly wrapped, at room temperature for up to a week. If you do not think you can eat it in that time, wrap the cooled, unsliced loaves with two layers of plastic wrap and cover that with one layer of foil before storing in the freezer for up to 3 months. They can be thawed or simply sliced from their frozen state before toasting.
Nutrition
Nutritional information is an estimate and provided to you as a courtesy. You should calculate the nutritional information with the actual ingredients used in your recipe using your preferred nutrition calculator.
did you make this recipe?
Make sure to tag @foodiewithfam on Instagram and #hashtag it #foodiewithfamily so I can check it out!
This post originally published February 2012, updated March 2020 with improved notes.




Reader's Thoughts...
Stacy Myers says
This. Is. So. Good. Seriously – bread doesn’t have to have forty thousand ingredients. Just the simple ones usually turn out the best. This is a definite keeper recipe for me. I used freshly ground white wheat berries and the result was fantastic. Can’t wait to eat it all – but I might share if the family is lucky. 🙂
Stacy says
I found the link to this through the Tasty Kitchen website. I am only a sometimes baker, and I found this to be so easy! My boyfriend was lingering in the kitchen the entire time this baked. I LOVED it. We froze one loaf…for about two days haha. Then we had to eat that one, too. Fantastic recipe, and I can’t wait to try it again.
P.S. your website is lovely. Whenever I feel stressed or overwhelmed at work I take a 5 minute FWF break 😉
Ruebellevue says
We’re a growing family of 6 here, and English muffins are among our family’s favorite bread treats! I’ve been busy baking, so my supplies were low. Using what I had on hand – freshly ground whole wheat flour and cake flour (!). Not thrilled about the combo but curious about results- will share after we let this first batch cool. Thank you for this site- it’s just what this busy mama needs!!
kate C. says
I’ve made this twice now, and it is so fantastic. I had made an english muffin bread before, but I like this recipe much, much better. I think I could easily subsist an entire day eating nothing but this bread with butter. (I use the toaster, but put it though 2x in a row and then smear with salter butter… lovely!)
Thanks again for this recipe!!
Julia says
I used only whole wheat flour, and it turned out lovely. I don’t keep all-purpose in the house. I’ve learned to just add vital gluten to the dough and whole wheat rises just as wonderfully as regular flour does. Thanks for the recipe, it was just what I was looking for!
Kim A says
Found a similar recipe in a Cooks Country Magazine earlier this year. Made it right away. It was well worth it. I was sceptical that it would taste like English Muffins, but it did and was to me even better. Been looking for that magazine ever since. Happy to see this recipe.
Ileen Cuccaro says
Mine is rising in the bowl right now, can to wait to try it
Julie says
I posted my comment a couple of days ago, but it doesn’t seem to be here….
Saw this recipe on Tasty Kitchen, added it to my virtual recipe box there. I made the half recipe, last week. I knew my Kitchenaid would not handle all the flour from the full recipe. Super easy recipe, I like that! When it came time to split the dough between two loaf pans, I could only locate one! Tore the kitchen apart, only 1 loaf pan. I have a sneaking suspicion that if I were to look next to my husband’s tool box, I may find it, full of nails, screw, nuts and bolts. :/ No bread for him!! Just kidding. 🙂 I grabbed my round souffle baking dish, it looks like a large ramekin, and put about 2/3 the dough in that, and 1/3 in the loaf pan I did locate.
The smell of the bread baking brought the teenager out of his cave. Boy was he disappointed when I pointed to your directions and told him that the bread had to cool. He kept going to the kitchen and touching the bread, reporting to me the exact moment in time when it was “cool”. Then he ate half the loaf.
This bread is super delicous, and the round loaf was a sight to behold. We didn’t behold it for long though, I sliced that baby up and made grilled cheese and basil sandwiches. There are three of us in the house, I made half the recipe, the bread was gone in less than three days. Therefore this bread is both incredibly delicious and very evil!
Thanks for this recipe, it’s a winner!!
Meredith says
Just saw this on Tasty Kitchen. It looks fantastic Rebecca!
Julie says
That’s where I found this recipe too!
Rebecca says
Thanks, Meredith and Julie!
Elleagee says
Would you please clarify the pan size, thanks (8.5 or 9.5)
Rebecca says
I actually use 2 of the 9.5 and 1 8.5, but really, you can use whatever you have on hand if you don’t overfill it!
Karen says
Found my way to your blog – by way of Pinterest. I worked back to the source of the recipe from another post – to find more detail/pan info. I am SO GLAD that I did. The bread is wonderful and as you said – the hardest part is waiting for it to cool! I’ve only looked at a few post – but I plan to spend more time. I like that you share details about how the recipe is special – or an event that sets the recipe apart. Thanks for sharing!
Angie says
My family loves this recipe, and it is so easy on the pocketbook! Now we are going gluten free- WAAAH! Has anyone tried making this with gluten-free flour?
Angie
Chris says
I just have to say thank you for sharing this. It is fantastic. I have been making lots of different breads lately, and have been searching for an easy english muffin. This is fantastic. Best homemade english muffins I have ever had. Thanks again.
Also tried the honey sesame chicken slow cooker recipe. Holy cow! I had the family raving and wanting more. May need to ‘quadruple’ the recipe next time! 🙂
Thanks again.
Chris
kim says
I have seen several versions of this floating around, it looks so good. I want to know if you can tell me how to substitute regular yeast when a recipe calls for instant? I have the Costco size of regular yeast and so many recipes use instant yeast and I’m just not sure what adjustments to make. Thank you!!!
Rebecca says
You can absolutely substitute regular yeast. I recommend that instead of whisking the yeast into the dry goods, you simply let it “proof” (or soften and get bubbly) in the lukewarm water with a pinch of the sugar before stirring it into the flour/salt/greater portion of the sugar. Other than that, you really don’t need to adjust anything!
Amy says
This bread looks so lovely and dangerous at the same time, can’t wait to try it!!
Julie says
I made this bread tonight. I had to barricade the opening to the kitchen – I had two kids, one husband and two dogs trying to steal a whole loaf. I have only made bread once before. This was soooo easy and soooo fantastic. I only had two loaf pans so I scooped the dough into a 7″ cake pan. It was great, a beautiful round loaf (which means more of a wonderful doughy middle). My family was so impressed. Thank you for making me look so good. I’m putting this into the must do again file
Ruth Ann says
This bread is incredible. And you are sooooo right. The bread MUST be toasted in a frying pan. I had company so I used a griddle.
JerryMe says
I just found your website via Tasty Kitchen and I have to say, although I shun most yeast breads, I think I’m capable of this one! Thank you, Rebecca!
kimberly says
Made this two days ago – and I am definitely hooked. This recipe is a keeper – thanks so much for sharing!
Kathleen S says
I made this today, and I had to keep chasing my husband out of the kitchen until the loaves were completely cooled. So…at 4:00 in the afternoon we scarfed down a half a loaf of this delicious bread. So easy and oh so yummy! Thank you, Rebecca, for yet another winner! Now I have to go work out.