If you want to make the very best pizza you’ve ever had, you’re going to need to start the process at least 10 hours but up to a day ahead of when you’d like to eat it. It doesn’t really require any skill-set beyond patience and the ability to follow four simple sets of directions.
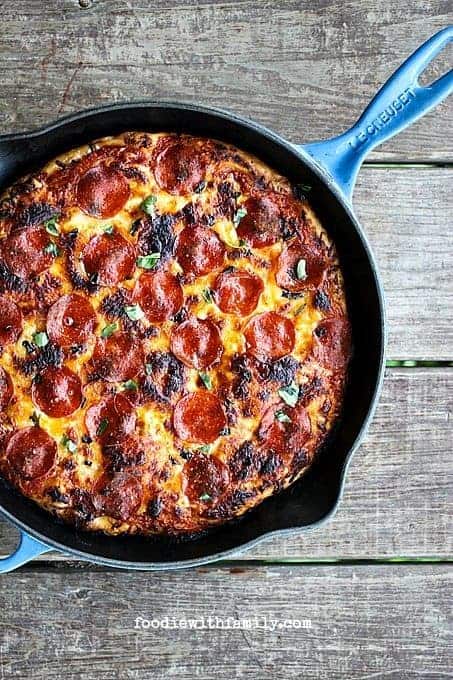
How to Make Pan Pizza
- 1. Measure, mix, and wait.
- 2. Divide, oil, and wait.
- 3. Top, bake, and wait.
- 4. Remove, slice, and wait.
Are you catching the theme? There’s a lot of waiting.
There’s NOTHING complicated but patience is non-negotiable. If you have a kitchen scale, this is the moment to break it out.
Measuring your flour, water, oil, salt, and yeast by weight insures that the only variables are ones outside of your control: humidity and heat. You can compensate for humidity and heat, but you can’t compensate for four ounces too many of flour because you didn’t measure correctly.
That’s right, I said it. Measuring precisely here is actually of paramount importance.
This is not a case where you grab that teacup your mom or grandma always kept in the flour bin, plunge it into the flour, and squish it up against the edge to pack it level. Just don’t.
This is a job for a scale that weighs in ounces, or -in a pinch- an occasion when you use a spoon to dip into the flour, shake it gently over the cup that you’re not shimmying in any way, and repeat until the cup is a little over full, then you use a flat edge of a butterknife or a spoon handle to level it off.
I’m not kidding you. You do not want a ‘workable’ dough that you knead.
You’re going to stir it all together with a spoon, cover it, and let it go overnight or for at least 8 hours. Yes, it sits on the countertop that whole time and does not go into the refrigerator.
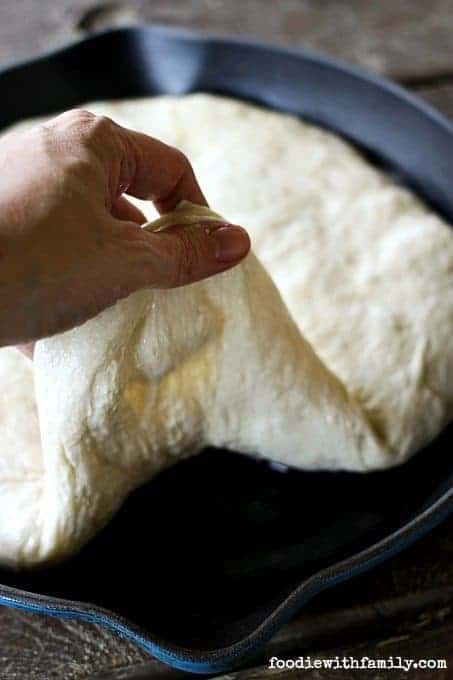
You’re seeking a slack dough. In fact, you’re looking for the kind of dough that will spread itself out in a well-oiled cast-iron skillet because that is exactly what you’re going to let it do.
Yes. No-knead dough that spreads itself in the pan.
Do I have you now? Once you get to that point, the toughest part is over with, unless you include the inner battle to avoid biting down on molten hot pizza that will remove the first layer or two of skin from your mouth.
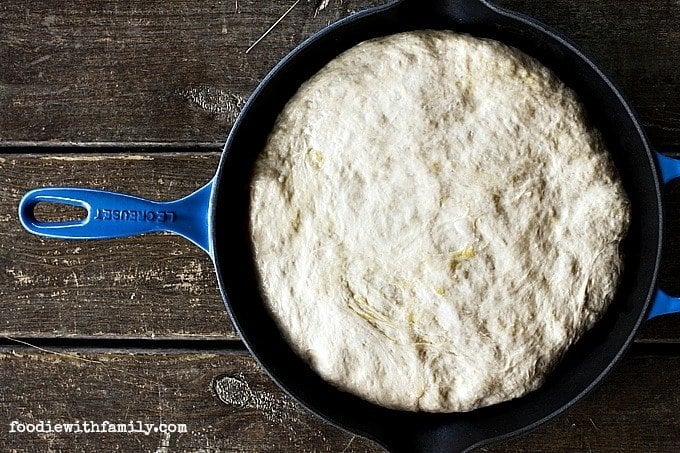
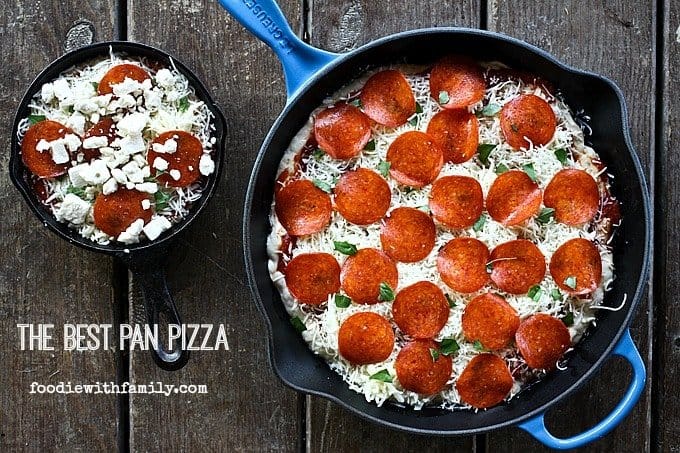
All that remains is to poke any extra large air bubbles with the back of a knuckle, lift the dough around the edges to eliminate any trapped air bubbles, and top it. Aside from the fact that the dough is DEAD easy as long as you know how to properly measure, there’s more to recommend this method.
Pan Pizza
EVERYTHING is assembled in ONE PAN. The dough spreads in one pan, is topped in the same pan, then cooked in that same pan.
You don’t have to muck up and dirty all kinds of dishes, remember to preheat a pizza stone, or fiddle around with a pizza peel to make this one pizza to rule them all. All you need is a solid, cast-iron pan or two and a dose of “I’ll wait for what’s great.”
If I had to compare the Best Pan Pizza to one that’s commercially available, I would first say, “Pffft. This is better than any commercial pizza.” then I would grudgingly admit it’s rather like the Pizza Hut Personal Pan Pizzas of my youth.
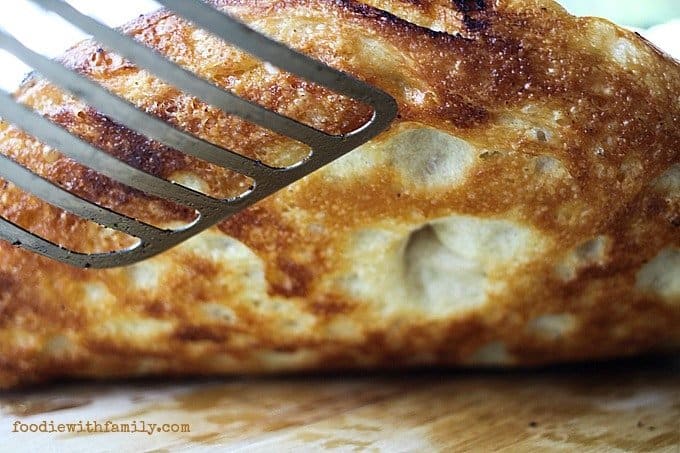
I loved those oil soaked, crispy bottomed, chewy little pieces of pizza heaven. The Best Pan Pizza is a little thicker than a thin-crust, but nowhere near the whole gloppy Deep-Dish pies of Chicago.
(Not that there’s anything wrong with those, but they’re just not what we’re looking for in your every-weeknight-pizza.) They are -in short- chewy, fried-crust, pizza perfection.
What kind of flour to use for Pan Pizza
The recipe specifies high-gluten (or bread) flour. This is not the same thing as all-purpose flour.
It has a higher protein (read: gluten) percentage which yields a chewier/holier dough. You will not get the same results from all-purpose flour, so it is best to seek out the high-gluten flour if it is available to you. (King Arthur Bread Flour has an excellent protein percentage for this pizza dough.)
Can you use all-purpose flour? Yes. It just won’t be the same. That said, you can definitely make it and it’ll be tasty; just different.
Can you use gluten-free flour? I honestly do not know. I’m sorry.
Gluten-free baking is a whole different field than my specialty. There are some folks who have weighed in on it in the comments section. Scroll through and maybe you can find some help!
How much flour and water to use for pizza dough
Body temperature water (just under 100°F) is the temperature of water you want to use in your dough!
Because baking is art as well as science, KEEP EXTRA WATER ON HAND when mixing your dough.
If you live somewhere humid, you’ll use all the water in the recipe, still. If you live somewhere arid, like the desert, you may need as much as 1/4 cup more water!
For the best results, use the dough in the video on this post as a visual cue for how it should look when just right.
As for flour, definitely weigh it out! I mean it! Don’t be tempted to add more flour to the mixture.
The dough should come together easily even if it looks shaggy. A dough whisk is your best bet for mixing thoroughly. Believe me, you not only don’t have to knead this dough, but you SHOULDN’T knead it.
The long, slow rise with a small amount of yeast allows the dough to fully develop the gluten that provides that lovely, holey structure.
The best cheese for pan pizza
When selecting which cheese to use, keep in mind that the Best Pan Pizza is not a good candidate for fresh mozzarella. The delicate texture and flavour would be lost in the blast-furnace that your oven is going to become.
You’re far better off buying a block of whole or part-skim mozzarella and shredding it yourself. Less great than block cheese grated yourself, but still better for these pizzas than fresh mozzie, is pre-grated mozzarella cheese.
Homemade Pan Pizza
Don’t make a mistake and choose too small of a bowl to mix/rise the dough in. This is going to expand to about eight times its original size, so use a very large mixing bowl, dough rising bucket, or a big old, non-reactive (stainless steel for example) pasta pot.
Store the rising dough, draft-free and at room temperature!
Pan choices count for your Best Pan Pizza. IDEALLY you will use two very heavy cast-iron, 10-inch skillets. If you don’t have two of those, you can use a 12-inch and an 8-inch or a 10-inch skillet and an 8 or 9-inch cake pan.
I used 12-inch and 10-inch enameled cast-iron Le Creuset skillets for both of my pizzas (and a bonnie wee 5-inch cast-iron skillet for another batch) and they were PERFECTION.
I used a cake pan for the second batch and while it did an admirable job, it didn’t get the crusty-bits I love so dearly up the side the way the Le Creuset skillets did.
Pan Pizza Recipe
Let’s talk oils. You want to choose one with a HIGH-smoke point because of the high-temperature of the oven.While extra virgin olive oil sounds like it would go with pizza, it’s a poor choice here because of its distressing tendency to billow smoke at any temperature above 375°F.
A better choice is regular old pure olive oil, but an even better choice is grapeseed or peanut oil. Canola oil or vegetable oil will do well if that’s all you have handy!
Speaking of oil, don’t skimp on the oil in the pan! It does triple duty here.
First, it allows the dough to spread itself easily, reducing or eliminating the friction it would experience against the pan. Second, it adds another layer of cooking to the exterior of the crust, essentially frying it as it cooks. Third, it’s just plain yummy.
Fire that oven up and don’t wimp out! Get your oven as hot as it can go for the cooking process.
That BURST of heat develops a bajillion little bubbles in the dough that helps lend to the chewy, hole-ridden texture so desired in a pan pizza. If you can get your oven up to 550°F (which is as high as my oven goes) DO IT.
If you can’t, just get it as hot as you possibly can shy of setting it on fire. Trust me.
Your oven goes no higher than 450°F you say? I’m sorry, that stinks. HOWEVER, we can work around it. This is where the ideal pan comes into play.
In this case, you take the pizza fresh from the oven when your toppings look just right, and set it directly on a hot burner to help crisp up the underside of the crust, lifting the edge carefully with a spatula or tongs from time to time to peek at the underbelly. When it looks deep brown and crisp, slide that pizza right onto a cutting board.
Let the pizza rest a bit before you cut it, if you value your skin. These things are HOT HOT HOT when they come out of the oven.
Let it rest at least 5 minutes, then slice it, then let it rest another 3 minutes before picking up your pizza to nosh on it. This will keep your precious mouth skin where it belongs: attached to you.
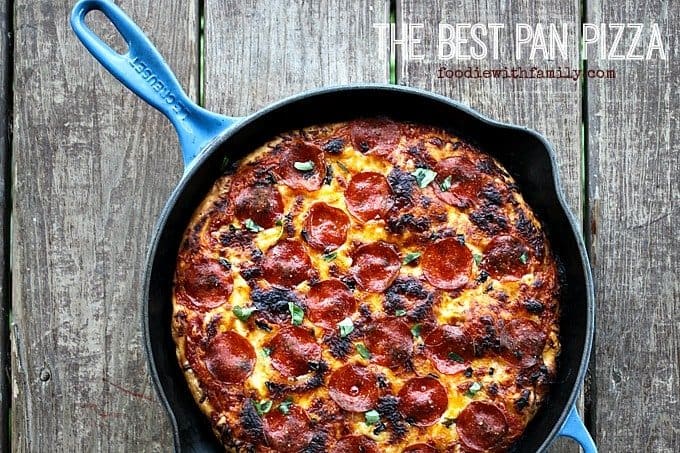
Use this to make The Best Pan Pizza
See how easy it is to make the Best Pan Pizza?
Calling all you pizza maniacs out there! After you try our Best Pan Pizza, be sure to try our Pickle Pizza, Figgy Pig Pizza; Tuscan Style Prosciutto, Fig, Greens Pizza, Smoked Salmon Cucumber Pizza, Honey-Drizzled Salami Pizza, and Roast Beef and Caramelized Onion Naan Pizza {10 Minute Meal}
The Best Pan Pizza
Rate RecipeIngredients
For the dough:
- 14 ounces bread flour 3 cups by volume
- 2 teaspoons kosher salt 3/8 of an ounce or .35 ounces
- 1/2 teaspoon instant yeast 0.06 ounce or 1.5 grams
- 1 1/2 cups water (12 ounces)
For the Pizzas:
- 4 tablespoons olive oil or neutral oil with a high smoke point like grapeseed such as peanut, or canola, divided (no extra virgin olive oil)
- 1 1/2 cups thick pizza sauce homemade or purchased
- 2 cups shredded mozzarella cheese
- 12-16 pieces of pepperoni per pizza
Optional but tasty:
- fresh basil leaves for adding before and after baking
Instructions
- Mix together all of the dough ingredients until it is evenly moist and there are no more pockets of dry ingredients. Cover the bowl or dough bucket tightly and let it rise for at least 8 but up to 24 hours.
- Pour 2 tablespoons of neutral oil into a 10 to 12 inch cast-iron skillet. Repeat with a second skillet. Swirl to coat the bottoms of the pans. Divide the risen dough into two pieces. Gently form into a ball by pulling the side of the dough and tucking it under, rotating 1/4 turn and repeating the tug and tug, rotating another 1/4 turn and repeating the tug and tuck, then finally doing it once more to form a loose ball. Lay it smooth side down in the oil, then flip so the whole thing is coated in oil. Use the palm of your hand to gently flatten the dough. It will not spread to the edges yet, but that is okay. Cover the pan tightly with plastic wrap and set out at room temperature -undisturbed- for 2 hours.
To Prepare the Pizzas:
- Preheat oven as high as it will go, preferably to 550°F. Remove plastic wrap from the pans with the pizza dough in them. The dough should now have spread itself (or nearly spread itself) to the edges of the pan. Simply lift the edges of dough to pull toward the sides of the pan if necessary. This will help loosen any trapped air under the dough as well. If there are any large air bubbles, nudge them down with the back of a knuckle.
- Spread half of the sauce on each pizza right to the edges of the dough. Divide the cheese and top each pizza evenly to the edge, then distribute the pepperoni over the pizzas. If using it, tear half of your basil leaves and toss over the tops of the pizzas. Reserve half of the basil to add to the pizzas when they’re removed from the oven.
- Put into the hot oven and bake for 12-20 minutes (depending on how well done you want your pizzas.) You can check the underside of the pizza crust for doneness by lifting the edge gently with a flexible spatula (like a fish turner). A finished pizza will have a crisp, deep-brown bottom and a bubbly, golden- to deep-golden brown top. I pull my pizzas when the edges have some deeply caramelized (read: lightly charred) edges and some dark brown bubbles on top.
- Use your flexible spatula to slide under the pizza and edge it out onto a cutting board, tear the remaining basil and scatter over the pizzas. Let rest for 5 minutes before slicing into wedges, then let it rest without moving it for another 3 minutes before serving.
Nutrition
Nutritional information is an estimate and provided to you as a courtesy. You should calculate the nutritional information with the actual ingredients used in your recipe using your preferred nutrition calculator.
did you make this recipe?
Make sure to tag @foodiewithfam on Instagram and #hashtag it #foodiewithfamily so I can check it out!
Are you a big fan of the Best Pan Pizza? Try these other best recipes!
- Best Middle Eastern Salad Dressing
- Best Thing Tomatoes
- Best Way to Cook Salmon – Air Fryer Salmon
- Best Method for Making the Best Baked Potato
Best Pan Pizza was originally posted August 1, 2014. Updated with video and tips in May 2017 and again in January 2021.



Reader's Thoughts...
TiffH says
Possibly this pizza! Yummy!! But probably sausage gravy for biscuits, because we’re from the south and that’s the almost daily request for breakfast!
wendy p says
For starters this fab pizza!!!
Jen P says
I would probably make pizza!!
Heather Spooner says
I’d probably cook a fried egg first. But your pizza would be on my must cook list. Thank you!
Inna says
I’ll try this pizza for sure!
I love the color of this pan – so fun!
Daina says
Ok, so I made this pizza today. Actually, I’m still making it because it’s still in the oven, but I have to say absolutely make the homemade pizza sauce! (Left a comment on that recipe as well). Holy moly it’s out of this world!! I couldn’t figure out why my pizzas were always so-so: it’s the sauce!! Thank you Rebecca for the link or otherwise I might not have ever found it. Now it’s bookmarked and printed off for my recipe drawer. 😀 It’s good enough just to rip off a hunk of crusty bread and dip it in and devour!
Judith M. says
Fried chicken first and then cornbread.
Elizabeth says
Skillet fried potatoes (in bacon fat).
Christine says
My apologies, please disregard my previous entry. I live in Canada and originally did not notice the remark stating the contest is open only to US residents.
Christine
Rebecca says
I’m so sorry, Christine! Sometimes those customs laws can be a real pain!
Christine says
The first thing I would make in the pan is your featured pizza. It looks amazing.
KB says
The decision is killing me. This glorious pizza, my first Dutch pancake, or a skillet cookie. I think it depends on if my sweet or savory tooth is singing when I get my hands on it!
Rie says
I’d make this pizza……Love it. Can’t wait to make. Happy Birthday Rebecca. I have a BIG one next month too!
Sharla says
I think I would love to try your pizza and I know my grandkids would too.
Anne Bullock says
I would cook a pizza just like yours.
Marjory @ Dinner-Mom says
I believe I would make the exact pizza shown here…it looks delish!
AmandaH says
Normally I would have said fried potatoes right off but I think I want to try that pizza you just posted. It looks amazing! And if I buy chain pizza Pizza Hut is my favorite. I am sure this one tops theirs by a mile.
Annie says
First, probably a skillet chocolate chip cookie. Then, this pizza!
Rie says
Ooohhhh…….could you share the recipe????? Please!!!!
mo says
I would make pizza.
Ashley says
Cornbread!
Anne Weber-Falk says
Gosh, this pizza looks like a good first. I would like to do this right now. Thank you very much.